Flying the VQ P-38 by George Lumpkin (Twinman)
Recently I have had the pleasure (See Terror in the Dictionary) of
getting to fly my new VQ P-38. I thought I would attempt to pass along
some of my thoughts and experiences to others who are crazy enough to
venture into the twin world, and particularly the P-38 world. I have
not flown the only other arf in this 83" market, but would assume
similar characteristics. Some of this article may seem overly simplistic
or even scary, but is only intended to aid the first time flight of
the P-38 to be a successful one.
Getting Started
First off, the P-38 model is not a trainer. My personal advice is to
not use the P-38 for a trainer on twins. There are problems with flying
it that are not for the inexperienced multi-engine pilot. This is not
to comment on anyone's piloting skills, but only to warn of potential
problems. Let your conscience be your guide. These problems stem from
the basic design of the P-38, and as we are not in the seat of the plane,
we are "Behind" in the reaction to problems when they occur.
As on any twin, you should learn to use the rudder at all times. Yes,
in all turns and maneuvers. Lose and engine and you do not have time
to learn rudder control. It is too late.
Things to consider about a P-38:
The engines are very far apart. This causes increased and powerful
yaw, should an engine fail. These sizes P-38 will snap roll almost instantly
if you lose an engine. The wing loading is very high and the airframe
is a very smooth shape. Landing speed is very high due to higher wing
loading. Note, as you get into larger P-38's, the wing loading goes
down and the landing speed actually decreases. You will also find that
the plane accelerates, in a dive, like a rocket. Now I understand why
the full size plane had a problem with approaching the sound barrier
and control problems in a dive in WWII. The P-38, in this size, does
not glide!!! It will fall. Do not cut the throttle, as you would with
similar size trainers, and expect a slow smooth glide to touch down.
Remember this and I will come back to it later. The rudders and sides
of the fuselage booms are very small, which does not help with yaw control
or stability. Actually, VQ is saying that they increased the rudder
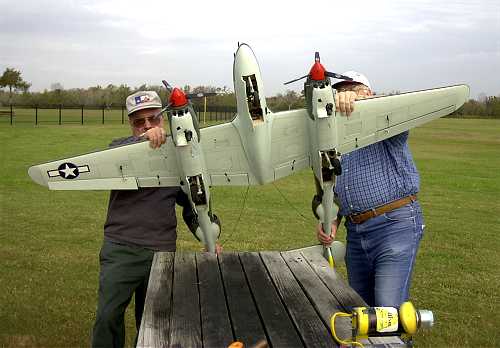
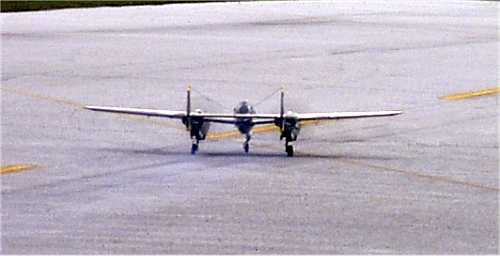
size by 10% to aid stability. Always have at least two people to start
and operate any twin. For the P-38 it is even more important to have
three. The vertical test is much easier if two people lift the plane
and the third controls the radio. The plane is not that heavy at 14
pounds, but difficult to handle alone for the vertical test. One more
time, do not do the vertical test or fly alone and use a partner for
any multiengine project.
Gyroscopes
Now before anyone starts in by saying that gyros are "Cheating",
let me say that this is up to the individual. I call them insurance
on a rather expensive model and an aid to controlling it and insuring
a longer life. Are gyros necessary to fly this or any twin or multiengine
model? No. I am going to cover the use and installation of these devices
and let others decide to use them or not. In my opinion, the main problem
with the P-38, for a modeler, is engine out. Reliability is extremely
important to a long life with this or any multiengine model. Gyros do
not substitute for reliability or the need for it. They are also not
"Auto Pilots". What they do is to dampen unexpected movements,
such as an engine out, to a speed that we can react to the problem,
without finding ourselves in an inverted "Spin of Death".
They also dampen, and in some cases prevent a snap roll, by making small
adjustments due to "Feeling" the movements that we did not
intend the plane to make. Gyros will not save you on an engine flame out on take off. REMEMBER
THAT!!!
Futaba, JR, FMA, and others all make gyros that will work in this installation,
and I have no intention to ignore these manufactures. I am sure that
they make excellent equipment, but I do not have experience with them
and so will confine my discussions to areas that I have actually worked
with. Do not use the helicopter so called "Heading Hold Gyro"
Do not turn off the gyros in the air. If there is a problem that requires
their use, you do not have time to find a switch. As long as you fly
the plane coordinated, meaning USE THE RUDDER, the gyro action is absolutely
invisible, except the plane is very stable. You must use the rudder
or the rudder gyro will fight a turn. You will also note that the plane
must be flown at all times. With or without a gyro, the P-38 is not
a trainer, and so do not expect it to self-level by releasing the sticks.
The gyros make this even more so.I used the Hobbico brand of gyros.
They have two kinds of these gyros. The Multi Purpose and the Aero
Multipurpose for the Rudders
The gyro for the rudders is to dampen the yaw of an engine out or some
maneuvers. It also aids in landing. If you lose an engine, the normal
series of events that happens very quickly, is that the plane will yaw
away from the running engine and the wing, with the running engine,
will rise and cause the plane to roll over and into a spin. The Multipurpose
is a single channel gyro that I used for the rudders. It is not adjustable
from the ground. I suggest that it be set to a gain of 50%. If you see
the plane "wagging" in the air, slow down and the wagging
will stop. Land and readjust to a lower sensitivity. I have had no problems
at this setting. Make sure that you install it per the instructions
and that the rudders move in the direction of the tail movement. DO
NOT REVERSE the action of the gyro!!!! If you move the rear of the plane
to the right, the rudders must also move to the right to counter the
movement. Now, this gyro is a bit "interesting" to install,
in that there is a trick that the instructions do not tell you. Install
your radio and center the rudders and nose wheel as normal. Now install
the gyro between the receiver and the three servos for nose wheel and
two rudders. Make sure the gain is at 50% and the "Center adjustment"
screw is in the center. When you install the gyro and the radio is turned
on, the control surfaces will definitely be turned to one direction.
Do not try to re-center using the "Center Adjustment" on the
gyro!! If you do, the radio commands will now not be able to swing the
rudders one direction fully. I do not know why this happens, but it
does. Take off the control arm of all three servos and reinstall to
center the control surfaces. Now, you can make small adjustments with
the centering screw and the trim tabs on your radio. Make sure the gyro
is installed near the CG of the plane for maximum effectiveness. Again,
if you move the tail of the plane to the right, standing at the rear,
the rudders must go to the right to counter the unexpected yaw. I installed
the gyro on top of the wing and under the canopy using either double
sided tape or Velcro. DO NOT install in such a way that you feel there
is any possibility the gyro can come loose. A loose and vibrating gyro
is really scary!!! With the radio on, roll the plane and make sure it
rolls straight. I have even gone as far as to put the nose gear on a
separate channel to control total movement and to be able to independently
adjust the nose wheel without disassembly of the plane to gain access
to the nose servo.
Hobbico Aero Gyro For the Ailerons
I used two separate channels for the ailerons for, to me, easier set
up. This gyro allows these two channels to be controlled. It is also
adjustable in the air for sensitivity or to turn off. DO NOT TURN OFF
IN THE AIR. You may need it. The idea of the gyro for the ailerons is
to dampen the very fast rising wing due to engine out or impending snap
roll to a level and rate that you can see and react to. This gyro does
require a separate channel to adjust the gain or even to turn off. I
put the control on a rotary knob and set at 50% gain with no hunting
problems. Note, it is normal for the gyro to take two or three seconds
to come on after you turn on the radio. Do not touch the controls until
you see it "Twitch" after powering up. This is something about
orienting itself. The gyro, itself, is installed again near the rudder
gyro under the canopy, and along the center of rotation, using double
sided tape or Velcro. Make sure it cannot get loose!!! Note the axis
of control in the instruction manual and marked on the gyro. This gyro
has no "trick" to install. Set up your ailerons as normal,
and install the gyro in series with the servo wires, noting the proper
polarity of the wires and control direction. Note, the direction of
each channel can be reversed using the on board switches in the gyro.
When properly installed and adjusted, the plane should be rocked up
and down sideways. In other words, the wings should be "Wagged".
The aileron control surface should go down on the wing going down, and
up on the wing going up to counter the rising wing in the event of trouble.
If you are not using separate channels for the ailerons, this gyro can
also control both ailerons, by installing it between the receiver and
the "Y" harness to the aileron servos.
Setting Up the Plane
By all means follow the recommended settings of the manufacture as
set forth in the instruction manual. One big area that I would differ,
is that the rudder throw should be as much as you can get, to assist
control in the event of engine trouble. Too much elevator and not enough
power will result in a very scary snap roll in a loop. Too much aileron
deflection could make the aileron too sensitive for some fliers. Set
the flap control for even deployment and retraction. They must be very
close to even, or the plane will turn on deployment. If you servos that
you used for flap deployment will allow, you can set a switch for 30%
deployment for take off and full for landing. I only use the flaps for
landing, but that is a personal choice. Note the VQ website for instructions
to construct a homemade tool for installing and removing the ball joint
in the wings. Recheck the balance of the model. Note, the balance must
be checked with the landing gear in the retracted position if you installed
retractable gear.
Landing Gear
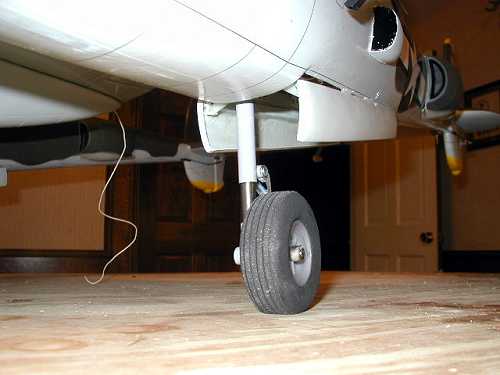
If you have a radio that will allow mixing on channels, I would make
a few comments or warnings as they pertain to the landing gear. The
VQ plane does not come standard with retractable landing gear. For this
discussion, I will assume the model does have it. If not, and you are
using fixed gear, the trim discussion will still apply, except you will
not have the open gear door and no change in trim between gear down
and up. The plane will take off with the landing gear down (DUH!!).
This creates a lot of drag, causing the nose of the plane to pull down,
until the landing gear comes up, which causes the nose to rise, if you
trim for gear down. You will need to set up the elevator to be approximately
1/8" high (Which will vary due to wheel size and balance) for take
off. If you do not make this adjustment or mix, plan for making an "up"
trim adjustment upon take off . It is a bit of a surprise to take off
using "up" elevator, get up, and relax the elevator and the
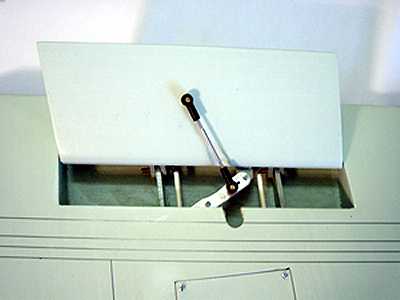
plane tries to dive. Be prepared for this. On the bench, cycle the landing
gear. Pay attention to the landing gear doors. Make sure the gear does
not hit or get caught in the doors during retraction and more importantly
extension. Any interference must be corrected now. Make sure the landing
wheels do not catch on any lip on the doors during the opening process.
Flaps
Set up the flaps, as per the instructions, and even deployment as
previously noted. Do not deploy the flaps until the down side of the
final approach or at least at approx ¼ speed. Make sure the throttle
is no less than ¼ flying speed. You do not want to stall!! If
you deploy at faster speeds, the plane will very quickly balloon upward.
I have now added a mix to put down elevator of approximately 1/8"
at flap deployment. I do not like to manually add down elevator upon
landing approach. The mix amount is approximate for a recommendation.
It will vary in amount due to speed and balance.
Engine Set Up
Reliability is the most important thing to remember to keep a model
P-38 in one piece. You must consider doing everything possible to make
the engines reliable. If you decide to invert the engines for scale
appearance, keep in mind that inverted engines are not as reliable as
up right or side mounted due to fuel forming a puddle in the glow plug
area and " Putting out the fire". It will probably be necessary
to rotate the engines slightly to get clearance for the mufflers and
cowls, and actually this helps keep, at least some of the fuel, away
from the glow plugs. Consider going to a hotter plug, such as a four
stroke. You should also consider going to higher nitro content in your
fuel, to get better idle. I would not go beyond 15% with two strokes
and 20%, perhaps YS blend, with four stroke. If consistent and reliable
idle, and transition, cannot be achieved, you may want to consider on
board glow drivers. While I never really like to "Go around"
with a twin due to the possibility of a flame out at low speed and low
altitude, you should plan and consider for it. I would set the drivers
to come on below 20% throttle, just to keep things "Lit".
You will also want to consider the possibility of remote glow drivers
for the glow plugs, if you do not use on board glow drivers. It is safer
than reaching under the cowls to attach and remove a glow plug igniter.
You may want the remote glow plug adapters anyway if you worry about
the driver battery failing. I not only put the two throttle servos on
separate servos, but I also put on separate channels. There are several
advantages to this. One is individual throttle control and idle adjustment.
This makes set up and adjustment of the engines much easier. If you
have a problem with one engine accelerating much better than the other,
and you do not have a low end problem, consider to use the exponential
feature, of many radios, to tailor the curve of one engine to the other
for even acceleration. Not complicated but it works.
Cooling

Cooling of the engines must be considered. The VQ engine cowl has good
openings for cooling, and they direct air over the cylinder head, but
no outlet to get the air out. The full size P-38 had a door under the
nacelles to allow air out from the oil cooler. I cut the openings under
the cowl to create this rearward-facing door. You want to leave the
bottom of the cowl, in the form of a rear-facing door, to draw the air
out by creating a low-pressure zone behind the door. If you have any
concern about cooling, you can add a baffle inside the cowl to direct
as much air as possible across the cooling fins of the engine. I am
using Super Tigre engines and have not had any problems in this area,
but do not let the engines go lean. The engines must be slightly rich
for reliability and cooling. Not too rich, or the engines will stumble
upon acceleration. The engines must transition smoothly.
Fueling
Don't forget to consider about remote fueling of the tanks. It can
either be done with an extra line and plug or one of those fancy remote
fueling plug type affairs, like the "Fuel Dot", and of course
the remote fuel plug with fueling adapter by Du Bro.
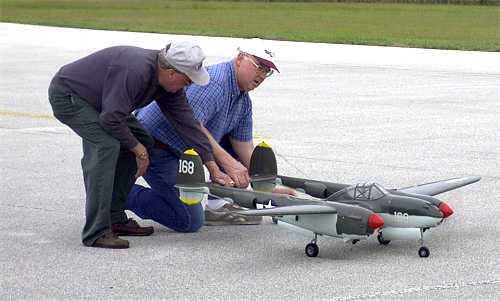
Vertical Test-Important
Testing. Before EVERY flight, use one or two of the local talent. (These
can be picked from the guys standing around wanting to see the take
off and flight, and betting on where the pieces will fall) For safety,
always use at least one assistant any time you work on a twin. For the
vertical test, it is easier if two men hold and rotate the plane to
the vertical position and bring the engines to maximum power. ANY sag
or change, must be addressed and eliminated prior to any take off. As
I have mentioned before, lose an engine on take off and the possibility
of a crash is almost a certainty. There is too much money and time invested
in this project to cut corners and hurry. It is really not a bad idea
to repeat this process on the runway to make sure that nothing has changed
as the engines warmed up and cooled off taxiing to the runway. Note,
keep your face and others away from the arc of the spinning propellers,
just in case one of the blades or spinner broke off…….You
did remember to tighten the propellers and spinners didn't you? Always
check the spinners and propellers for tightness and any cracks. Any
problems here and replace the components. Do not risk parts flying around
at 12,000 rpm. Don't forget to range check the radio before any first
flight, and it is always a good idea before any flight. Doing the radio
range check with the engines running is always a good idea.
Engine control
Always bring the engines up slowly on take off to avoid
engine flame out in transition. Do Not immediately fire wall the engines.
If an engine sags on take off run – do not take off! (Burn in brain).
You also run the risk of one engine really coming up and the other lagging
behind and now you have a powered ground loop with a tricycle gear.
Never, ever, “peak” the engines for maximum RPM by leaning
the mixture. This almost guarantees a dead engine . Run them slightly
(Read “more than normal” for a single) rich for increased
reliability. Never lean an engine to match the stronger engine. Yes,
one will always be stronger. Richen the strong engine down to the weaker
(that is running slightly rich …remember ). Check that idle speeds
match and idle mixtures are consistent for reliability and smooth transition
to full power.
Take Off
I personally prefer to not have others flying during the first flight
of a twin so that I can listen to the engines for any problems. If your
field is like mine, this is not a problem, as most people will be so
interested in seeing a P-38 go up, that they will stop everything to
get the betting on the crash and yelled encouragement going. (See "Vulture"
in the Dictionary) Use a helper, and if your field buddies are like
mine, you will have lots of help. Make the vertical test of engine reliability
one more time on the field. The "Tune" of the engines can
and does change as they warm up. Note that the glow plugs cool down
as you taxi to the field. The engines may not respond the same as they
did two minutes ago in the pit, due to this cooling down. Make sure
the engines come up and are reliable. Lose an engine on take off and
rotation, and you WILL CRASH!! The field I fly on is concrete, so I
must address the discussion to that type of field. Grass will be similar,
but acceleration rates will be different and possibly longer. Make sure
the plane rolls straight with the rudder surfaces straight ahead. You
do not want to fight an off center nose wheel and then have the plane
yaw, upon take off, to one side. I have found that the P-38 does not
take off like other planes I have flown. It just keeps gaining speed
on the ground until you force it into the air via rotation and application
of the elevator. IT IS VERY IMPORTANT to get as much speed for take
off as possible. Get everything your field will allow. If there is an
engine emergency you want as much speed and air over those rudders as
possible to maintain control. If the engines sag during the take off
roll, abort the take off, even if you risk damage to the landing gear.
If one engine dies shortly after take off and climbing, and you still
have control, immediately throttle back, gain stable control, keep the
speed up by lowering the nose now, and land straight ahead. Do not attempt
to circle back to the field. The damage of this type of emergency landing
will be much less than an inverted snap roll by trying to fly back to
the field. My personal favorite for the first take off, is to have an
assistant hold the plane, go to ¾ power, listen to the engines
one last time, take a deep breath, and have him release the plane. This
at least minimizes any problems of uneven engine run up during acceleration
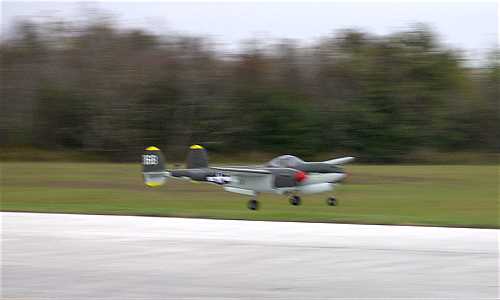
and the resulting veer to one side on take off roll. Upon lift off, watch out for the plane wanting to dive due to landing
gear drag. Get as much altitude as possible for safety, trim the plane,
and retract the gear. The plane will accelerate noticeably as the gear
comes up.
Flight of the Plane
Several things to note. The plane does not "feel" like a
trainer or single engine plane. (Duh!) It "Feels" heavier. Roll rates are good, but if you
are not using gyros, takes a bit of correction to stop the roll, due
to the weight of the engines on the wings. It is also faster in flight
than perhaps you are used to. Do not attempt to slow down to check low
speed reaction, and feel, unless you are four mistakes high. A low altitude
stall is not good in a plane that will really accelerate like this does.
It takes a good amount of rudder and elevator in a turn to bring this
plane around, but of course do not over do it, or you could tip stall.
You will find that a dive really causes this plane to accelerate like
a bullet. This is even true with the engines retarded. By all means
throttle back in a dive to keep the wings on!! Same thing goes for a
loop. Retard the throttle, but not to idle, as the plane goes "Over
the top" to keep "g" loading to reasonable levels. I
do not recommend attempting 3'd aerobatics in this plane, but if you
have the power, a loop is really neat to watch. Plan to bring the power
back on sooner than you are used to, to maintain stable flight speeds.
High Altitude Slow Speed Checks
Naturally, I would strongly suggest that you check low speed performance
and landing gear characteristics at four mistakes high. All of these
landing characteristics vary according to balance, props, and skill.
If there is any unexpected stall, point the nose down, gain speed, increase
the throttles, and gently pull out. Do not jerk it out. Jerking out
of a dive, at low altitude killed, very good real pilots in WWII.
Landing the P-38
Now is where the sweat really starts. Take off's are optional, but
landings are necessary, and YOU took off. First off take a deep breath-It
really, it helps. Do not plan on a slow easy approach. This plane will
land fast, and it is my suggestion to keep at least ¼ throttle
and fly it to the ground. DO NOT chop the throttle and expect it to
glide in. IT WILL FALL LIKE A ROCK. Bring the throttle to idle about
touch down. I would make the next steps as the plane is flying across
the field in front of you and at good altitude. Lower the gear, and
unless you programmed in up elevator during gear lower, expect the nose
to go down due to drag from the wheels. The plane will also slow down
noticeably, so only do this at level flying speed and throttle settings.
Keep flying speed up. Visually check that the landing gear is down on
all three gears. Next, drop the flaps. Plan on the plane trying to climb,
sometimes quickly. The "Balloon Effect" is more noticeable
if you lower the flaps at higher speeds. Be prepared for this, and do
not let the airspeed go down to a stall. The plane will slow down.
Keep Breathing!!!
Keep the altitude up and plan on a long approach. The reason for this
is that the plane really picks up speed if you do a diving approach,
and you could over shoot the runway. The plane will approach the field
at approx ¼ throttle, depending upon chosen power of the engines,
in a gentle arc down toward the runway. My advice is to fly the plane
to the ground under power. DO NOT CUT THE POWER AND EXPECT IT TO GLIDE!!
It will fall!! Bring the plane in over the runway and cut the power
about the time it touches down. If you have a concrete runway, it is
possible that the plane will not stop on the concrete. After touch down
and during the roll out, command full up elevator, which will aid the
stopping of the plane. It is possible that the front nose gear could
rise, so make sure you watch for any directional changes and correct
with the rudder. I have not had problems with control using this method.
Do not jerk the plane into a turn to keep it on the runway. You could
damage the wings or landing gear. If landing on grass, it will slow
down quickly. Now you can collapse with the heart pains, but don't just
yet, so you can enjoy the envy of all your buddies who were previously
betting on the crash site.
YOU DID IT!!! CONGRATULATIONS
Brakes
I use a field that has a concrete runway, and as such, am having a
problem stopping the plane. This is not mandatory, but is added for
general interest. I am going to modify my P-38 to add pneumatic brakes.
The brakes themselves are available from the same manufacturer of the
custom landing gear- Spring Air. Website at http://www.retracts.com/.
I do not want to use a simple off-on valve to avoid the tires skidding
and wearing a flat spot. I want to use them to slow down the plane on
landing. When I built my Yellow Manufacturing P-38 I used a variable
pressure regulator from Ultra Precision LTD. Website http://www.up-1.com/ They have a pressure regulator that can gently set the brakes proportionally.
Model U.P. 6. To get air pressure, you tee into the pressure line coming
out of the air tank and to the control UP 6 control valve. Using a standard
or even a strong mini servo, to control the valve, you "Y"
this servo into the elevator channel. Center the servo arm in its travel
and set the length of the control rod, to the brake valve, so that it
actuates as the elevator is pushed in the down direction. I would not
allow the servo to actuate the valve until approx 25% of down elevator
is actuated. You will never do that far in flight, unless you are crazy
enough to try three D aerobatics with a P-38. This prevents battery
use and wasted air pressure. You want free movement of the servo in
the up elevator direction, and that is easy due to a long free movement
of the valve spool. To use the brake upon landing, you simply apply
"down" elevator as the plane rolls out. The more "Down"
directed, the stronger the brake action. |
