|
| |
 |
| |
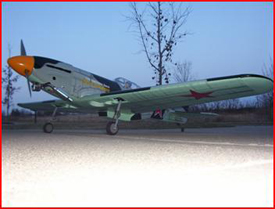
In a world of ARF’s, you have no problem finding the common warbirds out there such as the P-51, P-47, Corsair, Zero, and many others that seem to clutter the internet and magazines with countless adds trying to get you to purchase them at the lowest cost possible! When VQ Models decided to release their Mig-3, they took a leap of faith in selling a warbird that is not seen as much yet still have the quality and affordability in order to entice those few modelers willing to step out of the typical warbird spectrum and try something different. They succeeded!
I was really excited when Mike Kramer asked me if I would like to write a review on the VQ Warbirds Mig-3. I have owned several of their warbirds and love both the quality and affordability. It looks like VQ has added another feature to both by adding the retractable landing gear with oleo struts! I knew as soon as I received the airplane, I was going to be immediately excited to get started! |
| |
 |
|
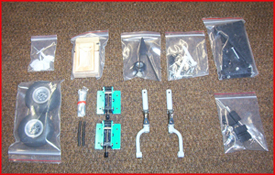
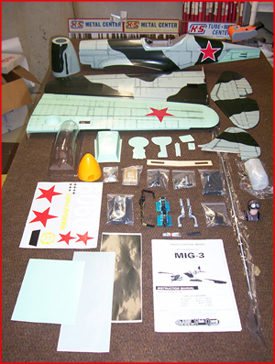
The first thing I noticed when I opened the box was the overall quality of the plane. Everything was separately wrapped and tucked neatly where there was no damage during shipping. All of the hardware was packed in its own separate bag. After inventorying everything, I was ready to get started. |
|
| |
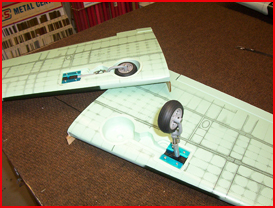
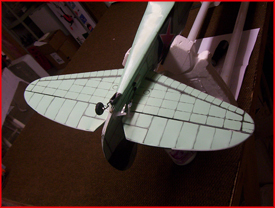
The first thing I decided to start on was the wing. I was curious to see how the oleo struts would fit and operate with the retractable landing gear. I was initially concerned they would be too heavy for the retract servo and that I would have an issue retracting and extending them. When I pulled the wing out and looked it over, I was really pleased with the overall detail which included rivets, panel lines, and even weathering. The supplied retracts fit right in the retract well with just a tad bit of carving with a hobby blade. |
|
|
| |
|
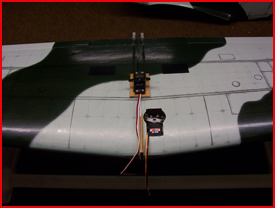
I usually install both gear and the pushrods before I glue the wing together. After looking at the manual, I was please to see that VQ Warbirds made a small compartment in the wing for the retract servo. This works out nice because with the retract servo mounted deep in the wing, there is no need for additional bending of the pushrods to get them to attached to the servo arms. This made the retract installation quick and easy. The first time I turned it on, the gear retracted and extended with no binding and no other problems! |
| |
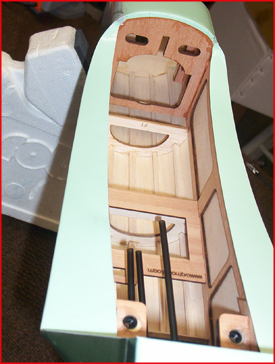
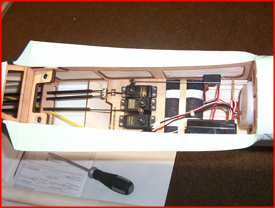
With the wing halves glued together and the retract servo mounted, installing the aileron servo was very easy. You just mount the servo in the pre-selected location with the supplied servo mount in and attached your pushrods! When it was time to start on the fuselage, I could really see where the attention to detail was. Not only was everything nicely glued into place, looking down the inside, I could see that there was no glue spillage nor were there any areas where you could see they may have rushed the build. In so many times, ARFs seem to be rushed through a factory and a lot of the attention gets lost during production. Not in this case. |
| |
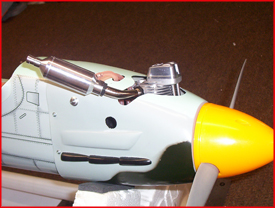
Another important point to mention was the fact that all of the plastic and fiberglass parts such as the wing fairings and the cowl matched the paint on the covering exactly! In a lot of ARF models, how many times have you pulled out the plane and noticed that nothing really matched. VQ Warbirds made sure that this particular plane would not have that problem! Everything matched and looked really nice on the plane.
All of the servo pushrod guides where already installed in the plane as well! All you had to do was install the pushrods and the guides led them to the appropriate location so you could hook in the elevators and the rudder. |
|
|
| |
|
|
| |
Mounting the horizontal and vertical stab was very easy. You have to trim off the covering where you are going to glue the stabs on. Install the stabs, make a small line with a pencil where the stab meets the fuselage and pull the stabs back out. You can cut along those lines and pull off the covering. This way you have a solid glue joint! Re-install the stabs and glue with some super thin CA.
As stated before, simply push the pushrods through the guides and mount the servo horns. Once those are mounted, All you have to do is screw in the supplied clevis and you are done. Another really nice feature that VQ Warbirds added was the pushrod exit covers. These little pre-painted plastic pieces really clean up where all the pushrods come out and help the overall appearance! |
| |
|
Mounting the rest of the servos and electronics were very easy. I followed the instructions where each servo was to go and installed the pushrods to the correct servo. There was more than enough room for everything and the pushrods lined up nicely with no binding. I decided to mount my receiver on the side of the fuselage with Velcro and run my antenna wire down the inside. This way the plane had a clean appearance. I used the supplied fuel tank which fit in the specified location with no problems. |
| |
I decided to mount an O.S. 71 4 stroke. There really wasn’t too much information on how to mount the engine so this was really up to me to figure out how to mount it right. I lined up the center of the firewall with the engine and test fit it a few times. When I was happy, I cut the fiberglass cowl. I would find out that this was a great engine choice! |
|
|
| |
 |
| |
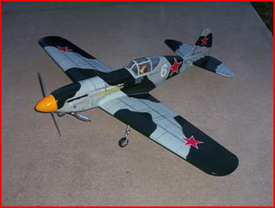 |
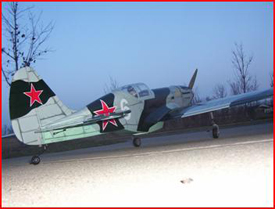
After the major components were installed, I mounted the wing and added the few extra stickers and sat back to admire a wonderful little plane. I couldn’t be happier with the turnout of this true quality ARF from VQ Warbirds. I feel that there attention to detail on this one scores high on my scale. For a fun scale ARF, this plane really looks good outside. I was very impressed with the overall detail and weathering that came right out of the box. Everything fit really nicely with little or no adjustments. I was overall, really happy with this plane. |
| |
The plane was balanced and control throws were set as per the instructions. I did notice that on takeoff the plane was a little tail heavy but manageable. I can’t complement this plane enough on the flight characteristics. Slow speed (even tail heavy) was very controllable and stalls were almost non-existent. It can perform every aerobatic maneuver in the book as well as fly very scale. Landings were a breeze. I kept about 3 clicks above idle until I was ready to set down and chopped the power, held elevator and she settled down very nicely. This plane flew great and would be a perfect intro level warbird! |
|
|
| |
|
If you are in the market for a fast, quality, and very reasonable priced warbird, I can assure you that you won’t be disappointed with VQ Warbirds Mig-3! This plane looks and performs awesome in the air. I have had so many complements at the field and have enjoyed every flight so far. This plane makes a great discussion piece and it is something different yet looks very nice. So, if you are in the mood for a good looking warbird that is not the typical P-51, P-47 or corsair, I say, head over to VQ Warbirds and pick up their awesome Mig-3! |
| |
| |
|