|
By Sam Parfitt
Page 8
Gear Door Hinges
|
I tested the ARF hinges on a piece of balsa and couldn't
find a suitable solution to using them.
Instead, I got some sonictronic hinges out that I had left over for the
P-28. These seem much better.
The key on the hinges is having the hinge pin along the top surface of
the door and fuse. The door will rotate along the axis of the pin.
If the pin is below the surface, the door will bind.
The ARF hinges have a base that is on both sides of the pin whereas
the Sonictronic hinge base only goes to one side of the pin. This allows
us to get the pin very close to the surface of door and fuse.
|
|
I used Sonictronic's #132, tri-cycle door kit. The Sonictronic
set has a sprung hinge which is used on each door.
This forces open the door. I believe there is only 1 set of sprung hinges
in each set so you'll have to buy 3 sets. The rest of the hinges set can
be used on tail draggers.
I had to cut notches in the fuse so the hinge pin can be at the surface
of the fuse. That notch is 1/8" deep or a skoch less and also a skoch
wider than the hinges.
You also want a flat surface below that notch for the base that will be
epoxied to it. As with the ARF hinges, I drilled 4 holes in each base so
the epoxy can ooze out and form rivets. |
|
The front hinge is sprung and the back one isn't.
|
|
Inside view. |
 |
|
The door is epoxied to the fuse.
|
Both doors in.
The spring forces both doors open. One control horn has been epoxied in.
The elastic string (wal-mart's sewing section) will be tied between the
two control horns and the strut will pull it down along with the doors (in
theory!).
|
 |
 |
Doors open with elastic band across the two control horns.
|
|
Doors closed.
(Miracles never cease, it works!!)
I still have to epoxy in the black plastic covers onto the gear doors.The
wheel goes below the surface of the gear doors on the nose wheel so no cutting
is needed on the gear doors. |
| |
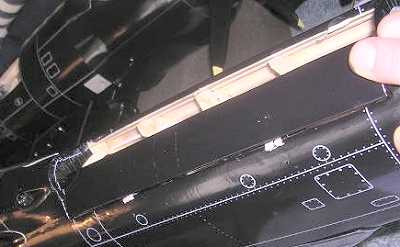
| Door hinges (mains)
First picture:
We're not so lucky with the mains: the doors have to be cut for the
wheel.
The brakes offset the wheel so it is not exactly in the middle between
the doors so I had to cut each door differently.
If you're not using brakes, your cuts should be symmetrical on both
doors. |
Here's the inside view of the black plastic cover. It has
to be trimmed so it doesn't hit the wheel. |
 |
 |
All cover doors and gear doors 'dry fitted'.
|
|
Gear doors for the boom. The sprung hinge is on the
right.
|
 |
| |
Gear doors for the boom. Outside view.
No cutting here: just epoxy them on (with holes in the hinges
for better holding power). |
|
Installation on the boom. |
 |
|
Used control horns with the elastic to close the doors.
I had to epoxy 2 more control horns on with the new ones higher up on
the doors (where the doors meet)
so they would close completely.
Since the strut is to one side, the strut puts unequal pressure (at a
different angle) on each door.
Too compensate, I had to put move the control horns up. Since the control
horns are are now on the far side of the doors, you could probably cut
them so they are stubby (with just one hole) so they wouldn't be so noticeable. |
|
Gear doors cut away for the wheel. |
 |
 |
With plastic covers glued on.
|
Doors open with plastic covers on.
I also had to cut the plastic covers so they wouldn't hit the wheel.
Usual procedure for the plastic covers: sand the edges and then epoxy them
on.
Paint the insides before installing them: unfortunately I didn't think of
that before installing mine so I'll have to brush the paint on instead of
spraying it on.
|
 |
 |
You need to cut the bottom of the nose cover so the gear
doors can close.
|
|
Each wing gets 2 screws on each side.
A drill bit was used to drill a smaller hole in the metal wing tube via
the already existing holes in the bottom of the wing.
I used Dubro's #383, #4X3/4" socket head sheet metal screws to hold
the outer wings on.
I like the socket heads over the phillips since they are less likely to
slip/strip the heads and you can put them on real tight.
|
 |
 |
Decals
Decals were added.
Not a whole lot of work here. After putting the numbers on the tail,
I cut some small squares from the cockpit decals and put them on the
screw holes that hold the horizontal stab on.
|
Don't do what I did and put those red rectangles in the
wrong place.
After checking my reference book, they should be between the red lines on
the wing between those two white circles (where the red 'dots' go).
|
 |
 |
I took liberty on the nose art.
Since my on/off, air fill, etc are under the nose (and removable),
I had to put the female behind the nose cone and the 'lady in the dark'
completely on the nose cone.
Putting part of each on the cone would result in them never being aligned.
|
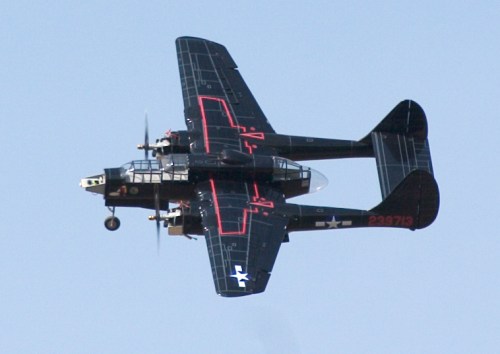
P-61 Flys!
|
P-61 in her maiden form: ie, no cowls and retracts stay down.
What the pics don't show is the first REAL maiden flight.
I took off and she immediately banked left: able to control her but
barely: needed 10 clicks right aileron to fix. Then only half a lap,
the right wheel and axle was hanging there by the brake line.
The dam pit crew didn't tighten the set screw!!
I had three other pilots around me which helped a bunch.
|
|
|
With the doors and the unlikely possibility of the retracts
going all the way up,
it was first decided to land on the asphalt runway.
Another good point made was once the right struts touched the runway, she
would have a tendency to go to the right. That was good so I was ready for
it.
I used about 40% flaps and she landed nicely.
I was surprised at how little metal that was removed on the bottom of the
one retract:
I would guess about 1/64".
The set screw was still in there and not even damaged so that shows how
little metal was scraped off.
I flattened the axle (which I forgot to do while assembling her) and took
her up again.
|
|
Flew great and she landed very lightly on all three retracts at
once: looked cool. She lands pretty easy and slower than the B-25. Watch
those takeoffs; get plenty of flying speed before taking off and make
that climb nice and gentle.
Both with the B-25 and P-61, I started the throttle slowly and then
gained flying speed.
ps: I'm the ugly one on the right!
|
|
Notice: Questions
or statements regarding product quality and/or usage are solely the opinion
of the writer and not necessarily the opinion or recommendation of rcwarbirds.com
or rcwarbirds.com owner/webmaster. By asking a question you are giving
rcwarbirds.com or rcwarbirds.com owner/webmaster the right to post your
question and name on this page. Not all questions are answered or posted.
All questions and answers are copyright rcwarbirds.com |
BACK to REVEIWS
|
|
Become an RCWarbrids site supporter by making a donation.
|
$5.00 |
 |
$10.00 |
|
$15.00 |
|
$20.00 |
|
| |
|
|
|
|